A firsthand account of turning a traditional cassava variety harvested near my home in Abia State into garri, and the observations that only come from doing this work for over 3 decades.
In my previous post, I documented the harvest of a traditional cassava variety from my plot near my home in Abia State.
The tubers came out well, with an average yield, firm and clean, typical of what this variety gives at 8 to 12 months in the ground.
Within 24 hours of that harvest, processing began. Cassava does not wait.
This post documents what happened next, how this batch moved from fresh tubers to finished garri, and the specific observations this particular variety and this particular batch gave me.
After more than 30 years of processing cassava in Isiala Ngwa North, I still find that each batch teaches me something. This one was no different.
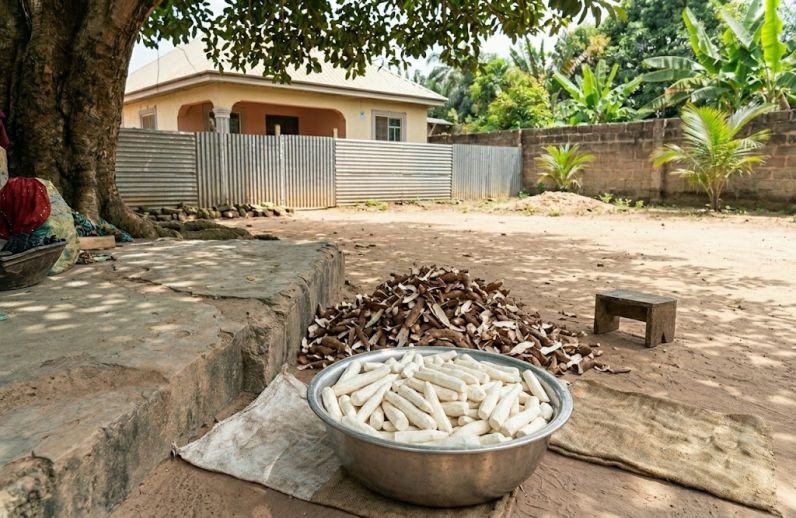
Peeling and washing
The first thing I noticed with this traditional variety, as I have noticed many times before, is how cleanly it peels.
Improved varieties like TMS 419 and TME 419 are bred for yield and disease resistance, but traditional varieties grown in this part of Eastern Nigeria tend to have a thinner outer skin that yields easily to the knife.
That makes the peeling stage faster and reduces waste.
After peeling, the tubers were washed thoroughly. This step is not optional and it is not rushed.
Soil and debris left on the root can affect the taste of the finished garri and introduce unwanted bacteria into the fermentation.
Clean tubers go into the grater; dirty ones cause problems down the line.
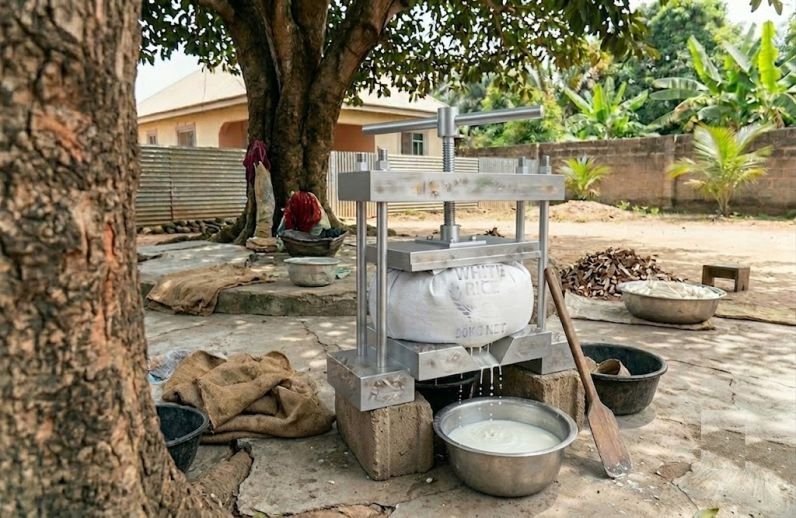
Grating and Bagging
The peeled tubers went through the grating machine, a locally fabricated grater of the kind used across processing operations in Abia State.
The machine shreds the fresh root into a wet mash. At this stage, I always pay attention to the texture of the mash coming off the grater.
A good mash from a healthy root has a certain consistency, not too watery, not too dry, and this batch gave exactly that.
FROM MY EXPERIENCE: Traditional varieties harvested at 8–12 months tend to produce a mash with slightly lower starch density than the same variety left in the ground longer. The mash is workable and ferments well, but if you are processing for starch extraction rather than garri, you are better off leaving this variety another three to six months. For garri, the 8–12 month window is perfectly fine.
Once grated, a few drops of red palm oil were added to the mash and mixed thoroughly for consistency before being loaded into mesh bags and tied firmly.
In my hometown, and in fact, the whole of Ngwa, we use the red oil to give the finished garri a yellow colour, just for aesthetics.
It is also believed that the red oil will remove any remaining cyanide that fermentation did not remove.
But besides all that, the red oil gives the yellow garri an earthy taste that is unique.
The bags were then stacked and weighted down for pressing and fermentation.
Fermentation — The Decision I Made with this Batch
This is where experience matters most and where this batch taught me its clearest lesson.
Fermentation time for garri is not fixed; it is a judgment call based on the variety, the ambient temperature, the moisture content of the mash, and what kind of garri you want to produce. Longer fermentation produces a more sour garri. Shorter fermentation gives a milder taste.
For this batch, I fermented for less than 24 hours. That was a deliberate decision based on two things: the ambient temperature in Abia State at this time of year is high enough that fermentation moves quickly, and this traditional variety ferments faster than improved varieties in my experience.
Pushing it beyond 24 hours in these conditions would have produced garri that was too sour for my household’s preference.
What this Batch Taught Me
In the heat of the Eastern Nigerian dry-to-wet season transition, traditional varieties ferment faster than many farmers expect.
If you are used to fermenting for 48–72 hours with improved varieties, do not apply the same timing blindly to a traditional local variety in warm conditions.
Watch the mash, not the clock. The smell and slight bubbling of the mash will tell you when fermentation has done its work.
Pressing and sieving
After fermentation, the bags were pressed again to remove as much remaining moisture as possible.
A drier mash fries faster, produces crispier garri granules, and reduces the risk of scorching on the pan.
This is a step that many small-scale processors rush, and you can taste the difference in the finished product.
Once sufficiently pressed, the fermented mash was broken up and sieved to remove lumps and any fibrous material.
The goal is an even, fine grain going onto the frying pan; consistency at this stage determines consistency in the finished garri.
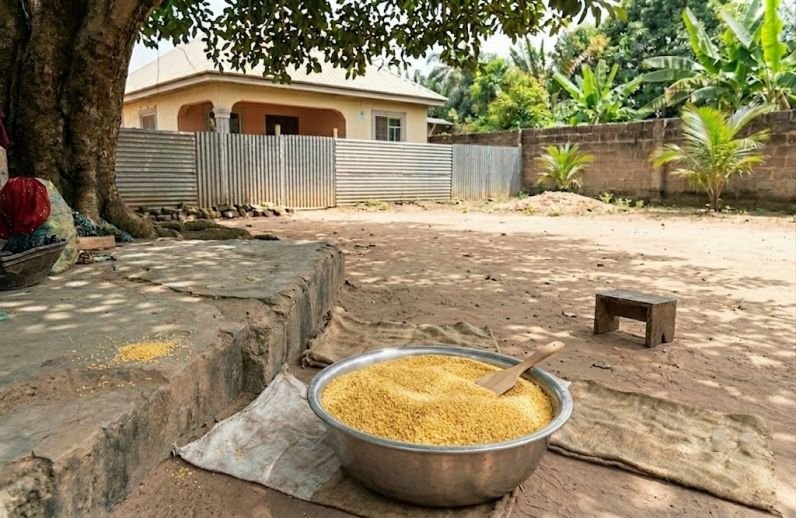
Frying — reading the pan
The frying stage is where garri becomes garri. The sieved mash goes onto a wide, flat iron pan over an open fire, and from that moment it requires constant attention: stirring continuously, adjusting the heat, watching the colour, listening to the sound of the granules as they dry and toast.
This batch fried well. The colour came out a clean white, which is what you expect from a traditional variety processed without palm oil.
The texture was dry and granular, the granules were even, and the finished garri had the slightly sour, toasted aroma that tells you the fermentation and frying were both done right.
FROM MY EXPERIENCE: The sound of garri on the pan changes as it dries. Early in the frying, the mash is wet, and the sound is soft and heavy. As moisture leaves, the sound becomes lighter and crisper — almost like sand shifting. When you hear that lighter sound consistently across the whole pan, you are close to done. Do not rely on colour alone. Colour can look right while the centre of the granules still holds moisture. Sound and feel together tell the true story.

The finished Product
The garri from this batch came out well: good colour, good texture, and the right level of sourness for a short fermentation.
It is the kind of result you get when the raw material is healthy, the fermentation is watched carefully, and the frying is done with patience.
This batch will serve the household. It will not go to market; the yield from this one plot is not enough for that.
But it closes the cycle that began when I planted those stems months ago: from soil to stem, from stem to tuber, from tuber to garri.
That full cycle, done by hand in Abia State in 2026, is what this project set out to document.
What Comes Next in this Project
The next project I will document in this category is stem selection and planting: what I look for when choosing cassava stems before the next planting season, and how I prepare them.
That post will take you to the very beginning of the cycle that produced this batch of garri.
If you have questions about garri processing, fermentation timing, or working with traditional cassava varieties, leave them in the comments. I will answer from experience.
Chimeremeze Emeh is a cassava farmer, processor, and exporter from Abia State, Eastern Nigeria with over 30 years of hands-on experience. He grows TMS 419, TME 419, and traditional local varieties on his farm and processes his harvest into garri, fufu, cassava flour, and starch. He built Cassava Pathway to share practical, field-tested cassava knowledge from inside the value chain — the kind that only comes from doing the work season after season. He is working toward establishing a modern cassava processing plant in Nigeria producing starch, sorbitol, and zero-waste by-products.