A soil test costs less than one bag of fertilizer, yet most cassava farmers skip it entirely and guess instead. That guess gets expensive fast, since applying the wrong fertilizer or lime can waste an entire season’s input budget.
I test my soil in Ntigha every two to three years, and the results have changed what I apply more than once.
Most farmers know cassava needs specific soil conditions, covered in our guide to soil requirements for cassava, but far fewer know how to actually check if their own plot meets them.
This guide walks through collecting a proper sample, avoiding the mistakes that ruin test accuracy, and reading a lab report well enough to act on it.
You will also find the DIY field test options worth using, and the ones that are not accurate enough to trust.
Table of Contents
Why Testing Matters More Than Guessing
Guessing at soil conditions leads to two expensive mistakes: applying fertilizer to a plot does not need it, or skipping lime that a plot desperately needs.
Our guide to soil requirements for cassava covers the exact pH range and nutrient levels cassava needs to thrive.
A soil test is the only way to know how your specific plot compares to that target before you spend money correcting it.
Collecting a Representative Soil Sample
A single soil sample is nearly useless, since nutrient levels vary meaningfully across even a small field.
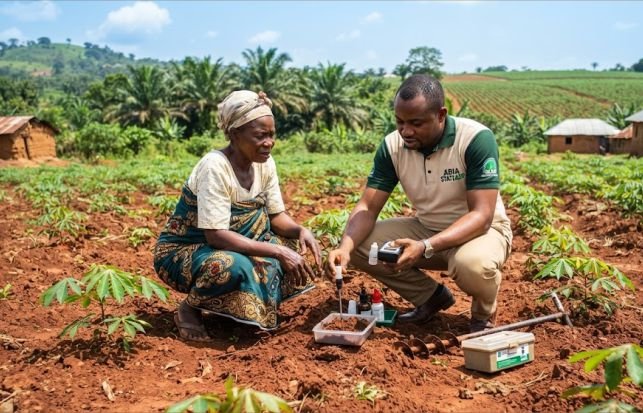
Combine 15 to 20 separate cores taken in a zigzag pattern across the plot, according to NC State Extension’s sampling guidance.
Sample to plow depth, typically 15 to 20 centimeters, since that is where most root activity and nutrient exchange happen.
Mix all the cores in a clean bucket before pulling out the final sample that gets sent for testing.
If one section of your field looks visibly different in color, drainage, or past cropping history, sample it separately.
Avoiding Contamination and Sample Errors
Soil test results are only as reliable as the sample collection process behind them.
Use a clean plastic bucket rather than a galvanized metal one, since metal can distort certain nutrient readings.
Avoid sampling right after applying fertilizer or lime, since recent applications skew results toward artificially high readings.
Let wet soil air-dry at room temperature before packaging it, following guidance from Colorado State University’s soil testing lab.
Label each sample clearly with the field name and date, especially when testing multiple plots at once.
When to Test and How Frequently
Test your soil every two to three years under normal cassava cultivation, or annually if farming the same plot intensively, per Cornell Cooperative Extension’s guidance.
Sample after harvest or a few weeks before your next planting, giving the lab time to return results before you need to act.
Most labs need about two weeks to process and report results, according to Oklahoma State University’s extension guidance.
Testing at the same time each cycle keeps your results comparable season over season.
Reading Your Soil Test Report
A standard soil report lists pH, available nitrogen, phosphorus, and potassium, plus organic matter percentage.
Compare your pH reading against the 4.5 to 7.5 range cassava tolerates, correcting with lime or sulfur only if you fall outside it.
Low phosphorus or potassium readings point directly to what your next fertilizer application should prioritize.
Organic matter below two percent usually signals a plot that would benefit from compost or cover cropping before the next planting.
DIY Field Kits vs Sending Samples to a Lab
Handheld pH meters and color-based test kits give a rough estimate, useful for a quick check between full lab tests.
These kits are rarely accurate enough to base a fertilizer budget on, since consumer-grade probes drift and color charts read subjectively.
A lab test remains the only reliable source for nutrient levels like phosphorus and potassium, which no consumer kit measures well.
Use DIY kits for a rough mid-season pH check, and rely on lab results for any real spending decision.
What I Do Differently After a Soil Test
On my own farm in Ntigha, a soil test years ago showed potassium running lower than expected despite the soil looking healthy.
That single result changed how I fertilize, since I now prioritize potassium-heavy amendments every other season instead of a flat NPK blend.
Our guide on applying fertilizer to cassava covers how to translate a soil report into an actual application plan.
Testing turned a guess I had made for years into a decision backed by an actual number.
Building Testing Into Your Regular Farming Routine
A soil test only helps if it becomes a routine rather than a one-time event.
- Test on the same schedule every cycle, ideally every two to three years for most cassava plots.
- Keep old reports on file so you can track if amendments are actually working.
- Pair testing with crop rotation, since rotation changes what your soil needs between cycles.
- Retest sooner if you notice yellowing leaves, stunted growth, or dropping yields without an obvious cause.
Our pillar guide to cassava farming covers where soil testing fits into the wider planting calendar.
For a broader soil-health context beyond testing alone, our guide to the environmental impact of cassava farming covers erosion and degradation risks worth watching for between tests.
Final Word From Cassava Pathway
Soil testing turns fertilizer and lime decisions from guesswork into something you can actually verify.
A proper composite sample, the right depth, and a consistent testing schedule matter more than which lab you eventually choose.
My own potassium correction in Ntigha came directly from a test result I would never have caught by simply looking at the soil.
Test before your next planting cycle, not after yields start slipping, and keep every report on file so you can track what actually changes.
Your next fertilizer decision deserves a number behind it, not a guess.
Frequently Asked Questions
How many soil samples do I need for one cassava field?
Combine 15 to 20 separate soil cores taken across the field into one sample, since a single core rarely represents the whole plot accurately.
How deep should I sample soil for cassava farming?
Sample to plow depth, typically 15 to 20 centimeters, since that is where most cassava root activity and nutrient exchange actually happens.
How frequently should I retest my cassava field’s soil?
Retest every two to three years under normal cultivation, or annually if you are farming the same plot intensively without rotation.
Are DIY soil test kits accurate enough to trust?
DIY pH kits work for a rough mid-season check, but lab testing remains the only reliable source for nutrient levels like phosphorus and potassium.

Chimeremeze Emeh is a tropical crop farmer and chemical engineer from Ntigha, Isiala Ngwa North LGA, Abia State, Eastern Nigeria, specializing in cassava and palm oil, with over 30 years of hands-on experience growing, harvesting, and processing cassava. He grows TMS series, TME 419, and local traditional varieties on his own farms and operates a small-scale cassava flour and starch production business through Cassava Pathway, which he founded as a CAMA-registered agribusiness in 2024. He is also the founder of Palm Oil Pathway, where he applies the same tropical farming expertise. His farms are located in Ntigha, Abia State.