
Soft, fluffy, and naturally gluten-free, learn how to make cassava flour bread rolls that are perfect for any meal! Get the easy recipe and pro tips for the best texture.
Looking for a delicious and gluten-free alternative to traditional bread rolls? Cassava flour bread rolls are a perfect choice!
Made from the root of the cassava plant, this flour offers a soft, light texture and a subtle, nutty flavor.
Whether you’re following a gluten-free diet or simply want to try something new, these bread rolls are a tasty option that pairs well with any meal.
In this guide, we’ll walk you through the simple steps to create these mouthwatering rolls, from mixing the dough to baking them to golden perfection.
Plus, we’ll share pro tips to ensure your rolls come out soft, fluffy, and full of flavor every time. Ready to bake? Let’s get started!
Related: Cassava Bread Types
Table of Contents
What Are Cassava Flour Bread Rolls?
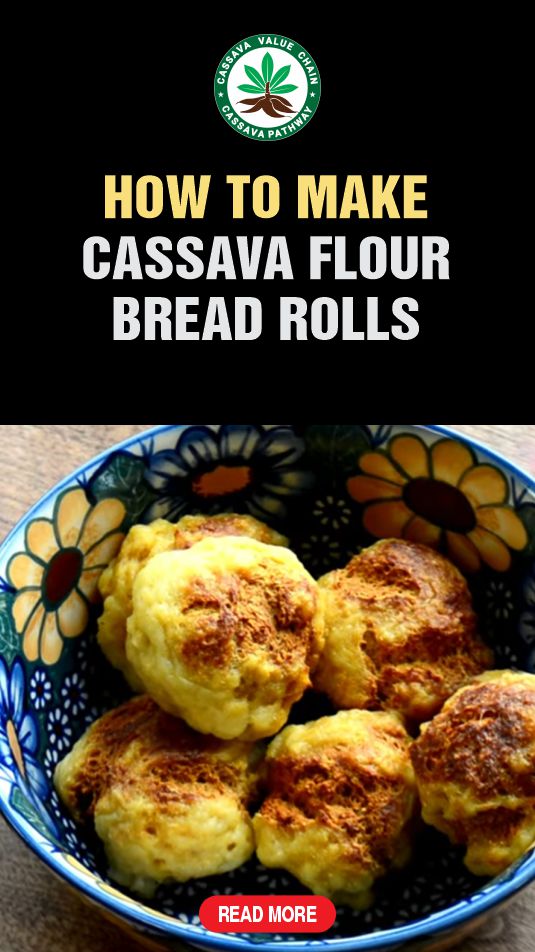
Cassava flour bread rolls are a gluten-free alternative to traditional bread rolls, made from cassava flour. These rolls are known for their soft, fluffy texture and slightly nutty flavor, making them an interesting addition to any meal.
Since cassava flour is naturally gluten-free, these bread rolls are ideal for people with gluten sensitivities or those following a gluten-free diet.
The dough is easy to prepare and can be shaped into rolls, which are then baked to golden perfection.
Cassava flour bread rolls offer a delicious, healthier option for bread lovers without sacrificing taste or texture.
Related: How to Make Cassava Flour Brownie
Ingredients and Their Roles
- Cassava flour: Flour from cassava is the primary ingredient and forms the base of the bread rolls. It provides a mild, slightly nutty flavor and a soft texture, making it a great gluten-free option. As it lacks gluten, it needs help from other ingredients to provide structure.
- Yeast or baking powder: Yeast is used for traditional, fluffy rolls, allowing the dough to rise and ferment, which results in a light and airy texture. On the other hand, baking powder can be used in recipes for quicker rolls, skipping the fermentation process and still achieving a soft texture but without the yeast’s rise.
- Eggs or binders: Since cassava flour doesn’t contain gluten, eggs or other binders like psyllium husk or ground flaxseed are crucial. They help provide structure and hold the dough together, preventing it from being too crumbly or falling apart.
- Liquids (water/milk): Liquids are essential for hydrating the cassava flour, which helps form the dough and ensures the rolls turn out soft and tender. Water is commonly used, but milk can be used for a richer, slightly creamier texture.
- Oil or butter: Adding oil or butter gives moisture to the dough, contributing to the softness and enhancing the flavor. Butter adds a slightly richer taste, while oil offers a lighter option.
- Sweeteners and salt: Sweeteners, like honey or sugar, help balance the flavor and promote browning during baking. Salt enhances the overall taste and complements the mild flavor of cassava flour, bringing out the best in the rolls.
Each ingredient plays a vital role in achieving the desired texture, flavor, and structure of cassava flour bread rolls.
Step-by-Step Guide to Making Cassava Flour Bread Rolls
Here’s an expanded, more detailed step-by-step guide to making cassava flour bread rolls, ensuring all the essential steps and nuances are covered:
1. Activate the yeast (if using)
If you’re using yeast for a traditional, airy texture, start by activating it. Dissolve the yeast in warm water (around 100°F or 38°C) along with a pinch of sugar.
Let it sit for 5-10 minutes until it becomes foamy. This step ensures the yeast is active and ready to help the dough rise. If using baking powder instead of yeast, you can skip this step.
2. Mix dry and wet ingredients
In a large bowl, combine the cassava flour, salt, and any other dry ingredients (like baking powder, if using).
Make a well in the center and gradually add the wet ingredients, including activated yeast mixture (if using), milk or water, eggs, and oil or melted butter.
Stir continuously as you add the wet ingredients to prevent lumps, ensuring the dough comes together smoothly.
Related Posts
Introduction to Cassava Flour Breads
Recipes for Different Cassava Flour Bread
Recipe for Cassava Flour Bread Without Eggs
3. Knead and shape the dough
Once the dough has come together, knead it gently on a floured surface (using extra cassava flour) for about 5-7 minutes, or until it becomes smooth and slightly elastic. If the dough feels sticky, sprinkle a little more cassava flour.
Once the dough has been kneaded, divide it into equal-sized portions and shape them into round rolls.
Arrange them on a baking sheet lined with parchment paper, ensuring there’s a little space between each roll for expansion.
4. Proof the dough (if using yeast)
If you use yeast in the dough, it’s important to let the rolls rise (proof). Cover the rolls loosely with a clean kitchen towel and place them in a warm, draft-free area.
Allow them to rise for about 30-60 minutes, or until they have doubled in size.
This process allows the yeast to work and creates a light, fluffy texture.
If you’re using baking powder, this step is not necessary, as the rolls will bake right away.
Related: How to Make Cassava Flour Vegan Pancake
5. Bake until golden brown
Preheat your oven to 375°F (190°C). Once the rolls have been proofed (if using yeast), transfer the baking sheet to the oven and bake for about 20-25 minutes, or until the rolls are golden brown on top and firm to the touch.
You can check by gently tapping the bottom of a roll; it should sound hollow when fully baked.
Allow the rolls to cool slightly before serving for the best texture.
6. Optional finishing touches
For a touch of extra flavor, you can brush the rolls with melted butter immediately after baking.
This step gives them a shiny, golden finish and enhances their richness.
You can also serve the rolls warm, paired with your favorite dips or dishes.
This step-by-step guide ensures your cassava flour bread rolls come out soft, fluffy, and delicious every time.
Suggested: Recipe for Cassava Flour Without Yeast
Differences Between Cassava Flour Bread Rolls and Cassava Flour Bread
While both cassava flour bread rolls and cassava flour bread are delicious and gluten-free, cassava flour bread rolls offer individual servings with a lighter, airier texture and a faster baking time, making them ideal for smaller portions or side dishes.
Cassava flour bread provides a denser, more substantial loaf that is perfect for slicing and serves as the foundation for various meals.
Let’s break down the differences:
1. Size & Portioning
Cassava flour bread rolls are baked in individual portions, meaning each roll is separated and can be easily served to guests or stored for later.
The size of each roll can vary, but they are typically smaller and more convenient for single servings.
In contrast, cassava flour bread is baked as a single loaf, which requires slicing.
This makes bread ideal for larger gatherings or as a staple that can be sliced and used for sandwiches, toast, or other meals.
2. Texture & Crumb
Cassava flour bread rolls generally have a softer and airier texture. Due to their smaller size and baking method, they tend to rise more evenly, giving them a light and fluffy crumb.
On the other hand, cassava flour bread is often denser, as the dough is in a larger loaf and may not rise as much in comparison.
This difference in texture can affect how the bread or rolls are used in meals, with rolls often being more tender and bread providing a more substantial bite.
3. Baking Time
Cassava flour bread rolls bake faster than the bread because of their smaller size. While bread may take around 40-50 minutes to bake through, rolls usually take about 20-25 minutes.
This makes rolls a quicker option for when you’re short on time or want freshly baked bread in smaller batches.
4. Serving & Use
Cassava flour bread rolls are perfect as side dishes, snacks, or even used as burger buns.
Their portions make them versatile for serving with soups, stews, or any meal that requires a smaller, easy-to-eat portion.
Cassava flour bread, on the other hand, is better suited for slicing into thick or thin slices for sandwiches, toasts, or as an accompaniment to a larger meal.
It’s a more traditional option when you need bread in larger portions, whether for breakfast, lunch, or dinner.
Related: Recipe for Cassava Flour Bread with Yeast
Tips for the Best Cassava Flour Bread Rolls
1. For a Soft Texture
To achieve soft, fluffy cassava flour bread rolls, it’s essential to use the right amount of liquid.
Cassava flour tends to absorb moisture differently than wheat flour, so ensuring enough liquid in the dough is crucial for a tender crumb.
A good binder like eggs, psyllium husk, or ground flaxseed helps provide structure since cassava flour lacks gluten.
These binders help hold the dough together and improve its texture, preventing it from becoming too crumbly or dense.
For an even softer texture, try incorporating some milk or a dairy-free alternative, as it adds moisture and richness to the rolls.
2. For Better Rise
Achieving a good rise is key to airy, fluffy rolls. Ensure your yeast is active by dissolving it in warm water with a pinch of sugar and letting it foam before adding it to the dough.
This step ensures the yeast is alive and ready to work. If you’re using baking powder instead of yeast, skip the activation step, but make sure the baking powder is fresh for the best rise.
Additionally, allow the dough to be proofread properly in a warm, draft-free environment.
Proofing is the process where the dough rises, and skipping this step or cutting it short will lead to denser rolls. Giving the dough enough time to expand helps create light, airy rolls.
3. For the Right Dough Consistency
Achieving the right dough consistency is critical for successful cassava flour rolls. Cassava flour dough can sometimes be tricky, as it can either be too sticky or too dry.
If the dough feels too dry, add more liquid (water or milk) to achieve a smooth, pliable consistency.
If it’s too sticky, sprinkle in a little extra cassava flour, but be cautious not to add too much, as this can affect the texture.
The dough should be soft but not overly sticky, allowing you to shape the rolls easily without them sticking to your hands or the surface.
Related: Making Vegan Cassava Flour Bread
Variations and Serving Suggestions
Cassava flour bread rolls offer endless possibilities for customization. From savory herbs and cheeses to sweet cinnamon and honey, these rolls can be tailored to any meal or occasion, whether as a side dish or a delightful dessert.
- Flavor additions: Add fresh herbs like rosemary or thyme, or grated cheese like cheddar or Parmesan, to infuse the rolls with savory flavors. You can also sprinkle seeds like sunflower or sesame for crunch.
- Serving ideas: Pair cassava flour bread rolls with comforting soups, creamy spreads, or tangy dips like hummus or guacamole. They also complement savory dishes like stews or grilled meats for a complete meal.
- Sweet versions: Transform the rolls into a delightful dessert by adding sweet spices like cinnamon, nutmeg, or cardamom. Drizzle with honey or maple syrup for a rich, slightly sweet finish perfect for tea time.
Common Mistakes and How to Fix Them
- Rolls Not Rising Well: Check the freshness of your yeast, as expired yeast won’t activate properly. Ensure the dough is proofed for long enough in a warm, draft-free area for the yeast to work effectively.
- Dough Too Dry or Too Sticky: Adjust moisture by adding liquid gradually for dry dough or sprinkle cassava flour to reduce stickiness. The dough should be soft and smooth without being overly sticky or crumbly when shaping.
- Crumbly Texture: A crumbly texture often happens if there aren’t enough binding agents. Use eggs, psyllium husk, or flaxseed to help hold the dough together, ensuring a more cohesive and tender roll structure.
Cassava flour bread rolls are simple to make and a delicious alternative to traditional wheat rolls. With the right ingredients and techniques, they turn out soft, flavorful, and perfect for any meal packed with flavor.
Video on How to Make Gluten-free Cassava Flour Rolls
Frequently Asked Questions
Can I use baking powder instead of yeast in cassava flour bread rolls?
Yes, you can use baking powder for quicker rolls, but the texture will be denser compared to yeast.
Are cassava flour bread rolls gluten-free?
Yes, cassava flour is naturally gluten-free, making these bread rolls a great alternative for those with gluten sensitivities.
Can I freeze cassava flour bread rolls?
Yes, you can freeze the rolls once baked. Simply let them cool, then store them in an airtight container.
How long do cassava flour bread rolls last?
Cassava flour bread rolls typically last up to 3-4 days when stored in an airtight container at room temperature.
Conclusion
Cassava flour bread rolls offer a delicious gluten-free alternative to traditional bread, with endless possibilities for flavor variations and serving ideas.
Whether you enjoy them soft and savory with herbs or sweetened with cinnamon and honey, these rolls can be customized to suit any meal.
By following simple tips for texture, rise, and dough consistency, you can easily master making them at home.
Don’t forget to troubleshoot common mistakes, like dry or sticky dough, by adjusting the ingredients and techniques. With a bit of practice, you’ll have perfect cassava flour bread rolls every time, ready for any occasion!

Chimeremeze Emeh is a writer and researcher passionate about Africa’s most transformative root crop—cassava. Through his work at cassavavaluechain.com, he explores the entire cassava industry, from cultivation and processing to its diverse applications in food, health, and industrial use.
He also writes for palmoilpalm.com, where he shares his extensive experience and deep-rooted knowledge of palm oil, covering red palm oil, palm kernel oil, and refined products. His work there reflects his lifelong connection to agriculture and his commitment to promoting sustainable value chains in Africa.
Driven by curiosity and purpose, Chimeremeze aims to shed light on how cassava continues to empower communities, strengthen food systems, and link traditional farming wisdom with modern innovation.