Baked yuca fries bring crispy edges, creamy centers, and a bold twist to your side dish game, no deep fryer needed, just your oven and a few simple steps.
Baked yuca fries give you a fresh take on comfort food. If you’ve only had regular potato fries, you’re in for something different.
Yuca, also called cassava, cooks up with a crispy edge and soft, chewy center when done right.
It absorbs spices beautifully, which means you can season it exactly how you like.
These fries are naturally gluten-free and filling, making them a smart pick for anyone watching ingredients or looking for something new.
Baking instead of frying cuts down on extra oil without losing the crunch you want. You don’t need fancy tools or hard-to-find ingredients.
Just a few simple steps in your oven, and you’ve got a side dish or snack that’s full of flavor and texture.
Let’s walk through how to make baked yuca fries that turn out golden, crispy, and satisfying every time.
Recommended: How to Make Homemade Dipping Sauce for Cassava Fries
Ingredients You’ll Need
Make every bite count with the right ingredients. The success of your crispy baked yuca fries starts with what you choose to put on your tray.
Yuca: Fresh or Frozen
You can use fresh or frozen yuca. Fresh gives a better texture if prepped right. Look for firm, white roots without blemishes.
Frozen yuca saves time and still delivers great results. Just choose a trusted brand to avoid bitter or stringy pieces.
Both work well for baked yuca fries.
Olive Oil: The Crispy Secret
Olive oil helps the yuca crisp in the oven. Use extra virgin for a clean, natural flavor.
Just two to three tablespoons will coat the fries without making them soggy.
Toss thoroughly so every piece is covered evenly. Avoid overdoing it to maintain that light, crispy texture.
Sea Salt: Simple but Important
Sea salt brings out yuca’s natural taste. Fine salt sticks better, while coarse salt adds a slight crunch.
Season before and after baking for full flavor. Salt works with the oil to help the fries turn golden and satisfying.
A little goes a long way, so use with care.
Garlic Powder: A Subtle Kick
Garlic powder adds gentle flavor without overpowering. It blends well and avoids burning, unlike fresh garlic.
Just a small amount before baking gives your fries a savory edge.
It pairs nicely with yuca’s earthy taste and adds depth to every bite without needing extra sauces or seasonings.
Paprika: A Hint of Warmth
Paprika adds mild heat and color to baked yuca fries. A light sprinkle before baking gives a warm, smoky flavor without being too spicy.
Use regular or smoked paprika depending on your taste.
It also makes the fries look more appetizing, especially when combined with garlic and sea salt.
Related Posts
How Nutritional are Yuca Fries?
Yuca Fries vs French Fries: The Ultimate Comparison
How to Make Yuca Fries with an Air Fryer
Guide to Popular Cassava Recipes
How to Make the Vegan Cassava Flour Pancake
How to Make Baked Yuca Fries (Step-by-Step)
Take it one step at a time. With just a few tools and the right process, you’ll turn yuca into golden, crispy fries you’ll want to make again.
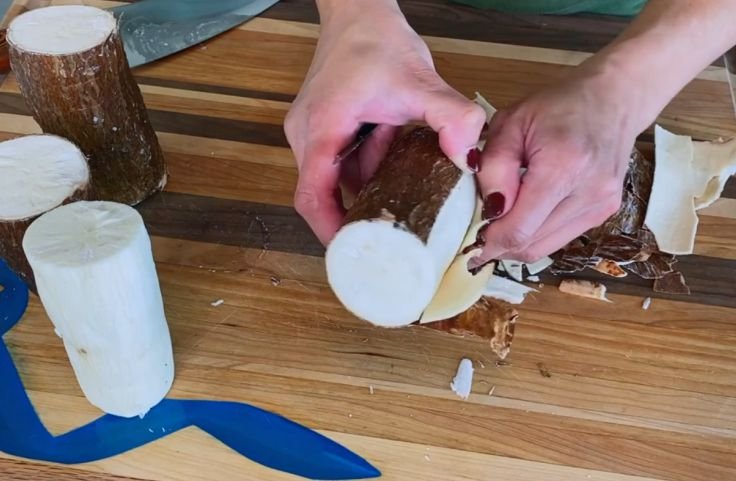
Peel and Cut the Yuca
Start by trimming off both ends of the yuca root. Use a knife to peel away the thick brown skin and remove the thin inner layer underneath.
That layer can be tough and slightly bitter, so don’t skip it.
Once peeled, slice the white flesh into even sticks, about the size of regular fries. Keeping them the same size helps them cook evenly in the oven later.
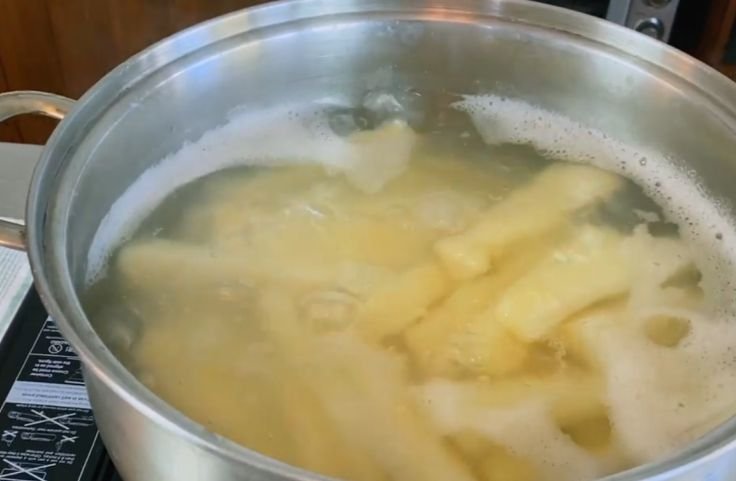
Boil Until Just Tender
Bring a pot of water to a boil and drop in your yuca strips. Cook for about 15 minutes.
You want the pieces to be tender enough for a fork to go through, but still firm.
Overcooking makes them break apart. Drain them once they’re ready and let them cool for a few minutes before you handle them again.
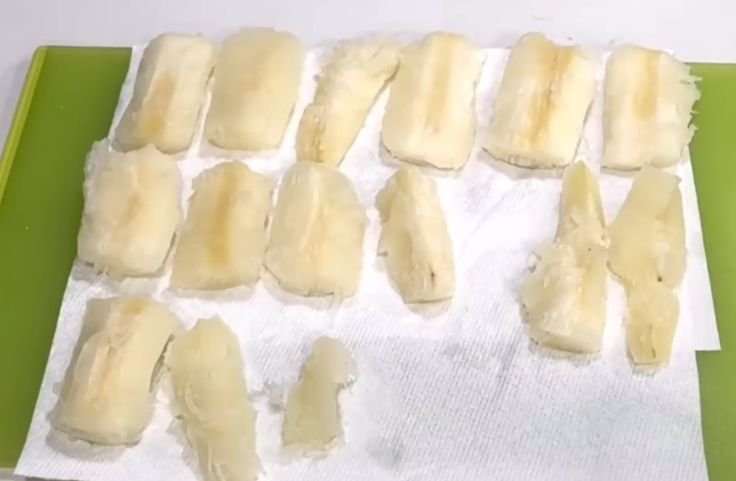
Dry Thoroughly Before Baking
Once the yuca is cool enough to touch, dry it well. This part matters. Wet yuca will steam instead of crisping in the oven.
Use paper towels to blot any moisture from each piece. Take your time with this step.
The drier the yuca, the better chance you have at a crispy bake.
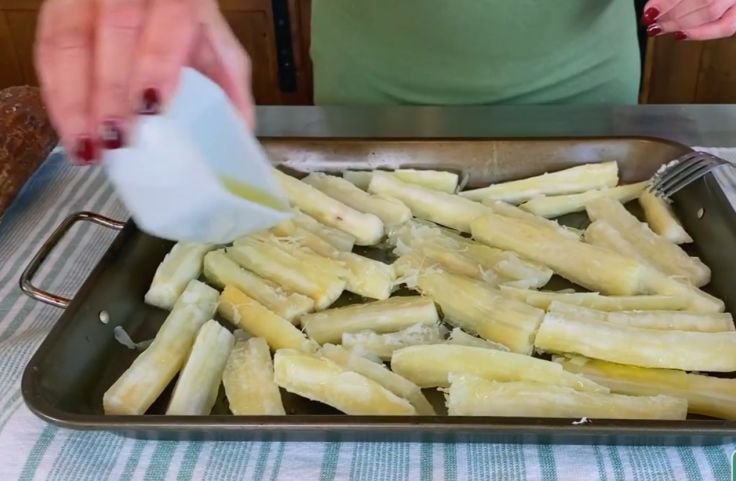
Season and Oil Evenly
Place the yuca in a large bowl and toss with salt, pepper, and your choice of spices like garlic powder or paprika.
Add two or three tablespoons of olive oil and mix well. Every piece should have a light coating.
This helps flavor stick and gives the fries a better chance to crisp up in the oven.
Spread on a Baking Sheet
Preheat your oven to 425°F or 220°C. Line a baking sheet with parchment paper and place your yuca fries in a single layer.
Make sure they’re not touching. Overcrowding traps steam and stops them from browning properly.
Leave some space between each one so the heat can do its job.
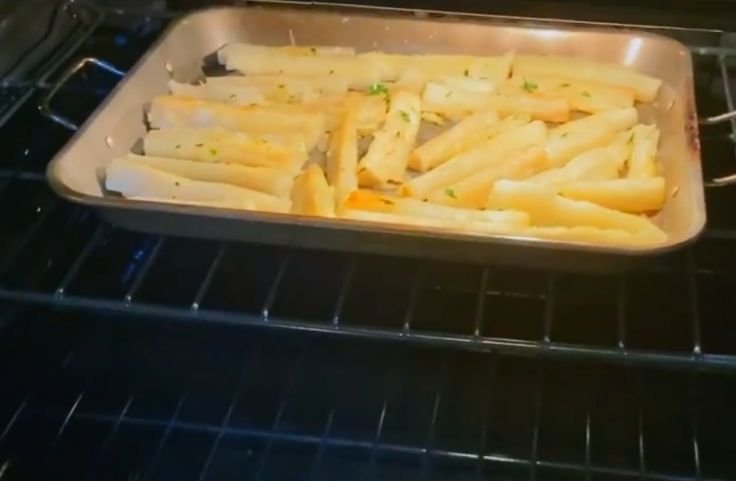
Bake and Flip for Even Crisp
Place the tray in the oven and bake for 25 to 30 minutes.
Flip the fries halfway through so they cook evenly on both sides.
Watch for a golden color and crispy edges.
Once they’re done, remove them from the oven and let them rest for a minute before serving.
Tips for Extra-Crispy Baked Yuca Fries
Getting that golden crunch takes more than just time in the oven. Follow these simple tips to turn your baked yuca fries into something truly satisfying with every bite.
Dry the Yuca Completely
After boiling, the moisture stays trapped inside the yuca. If you skip drying, you risk soggy fries.
Use a clean kitchen towel or paper towels to press out as much water as possible.
Drying each piece thoroughly gives them the best shot at crisping instead of steaming.
It may take a few minutes, but it makes a big difference in the final texture.
Avoid Overcrowding the Tray
Yuca fries need space. When they’re crammed together, the heat can’t reach them evenly.
Instead of baking, they steam, and that means limp fries. Give each piece room to breathe.
If your tray gets too full, bake in batches. This helps air circulate properly and gives you an even, golden crisp on every side.
Use Parchment Paper for Better Crisp
Lining your baking tray with parchment paper helps the fries crisp instead of stick.
It allows for better air circulation under each piece. For even more crispiness, give the paper a light spray of oil before placing the fries.
This step also saves you cleanup time and helps the fries brown evenly underneath.
Flip Halfway Through Baking
At the halfway point, gently flip each yuca fry using tongs. This simple move helps both sides brown and cook evenly.
Skipping this step can leave one side pale or undercooked.
Turning them also helps keep their shape and texture, so they finish crisp, not crumbled. Be gentle and quick, then let them finish.
How to Make Baked Yuca Fries from Frozen Roots
Using frozen yuca makes the process easier, but a few simple steps will help you get the crispy texture and full flavor you’re looking for.
Choose the Right Frozen Yuca
Start by checking what type of frozen yuca you have. Some come already cut into fries, while others are whole chunks.
Pre-cut fries will save you time, while whole pieces give you more control over shape and size.
Both options work well. Your approach just needs to match the form you’re using to get the best results.
Boil Pre-Cut Frozen Yuca Briefly
Even if the yuca is already cut, a quick boil helps soften the inside before baking.
Bring salted water to a boil and cook the fries for 5 to 7 minutes. Drain well and let them cool slightly.
This step helps you avoid dry or rubbery centers and gives you that fluffy interior with a crispy bite.
Prepare Whole Frozen Chunks Properly
Whole frozen yuca needs a bit more time. Boil the chunks for 15 to 20 minutes until they’re fork-tender. Let them cool, then peel the outer layer carefully.
Once peeled, slice them into even fry-shaped pieces. This gives you a soft, creamy inside and sets you up for a perfect bake later.
Adjust Baking Time Based on Size
Once your yuca is cut, toss it in oil and seasoning. Bake at 425°F or 220°C. If the pieces are small or thin, bake for 25 to 30 minutes, flipping halfway.
Thicker fries or freshly cut chunks might need 5 to 10 extra minutes. Keep an eye on color and texture to guide you.
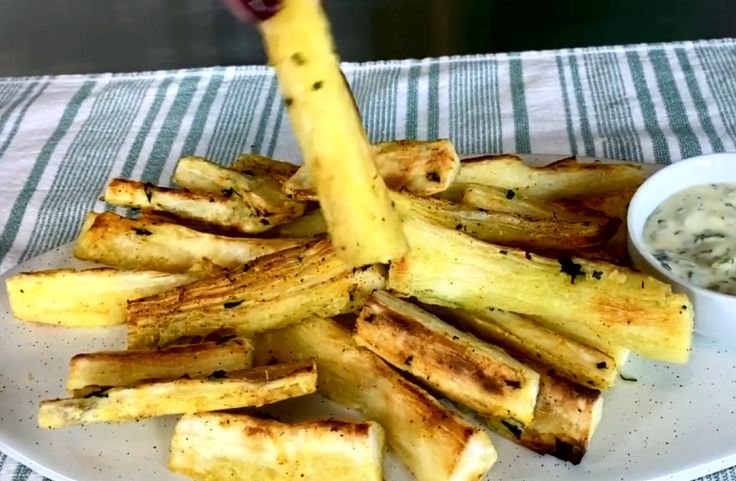
Serving Suggestions and Dipping Sauces
Once your yuca fries come out of the oven golden and crisp, the next step is pairing them with flavors that bring everything together.
Here are a few simple ideas to try.
Pair with Spicy Ketchup
Spicy ketchup gives your baked yuca fries a bold, tangy finish. Just mix your regular ketchup with a bit of hot sauce or cayenne pepper.
This simple dip balances the creamy inside of the fries with a little heat.
It’s easy to make and adds flavor without taking attention away from the yuca itself.
Try a Creamy Garlic Aioli
A homemade garlic aioli brings a smooth and rich taste to every bite. Blend garlic, mayonnaise, lemon juice, and a little salt.
This creamy dip adds contrast to the crisp texture of yuca fries. If you like stronger garlic flavor, let it sit for a few minutes before serving to deepen the taste.
Go Fresh with Chimichurri
Chimichurri sauce adds a herby punch that works well with baked yuca.
Made with parsley, garlic, olive oil, and vinegar, this sauce is bright, tangy, and full of flavor.
It cuts through the starchiness of the yuca and gives your plate a fresh lift. You can make it chunky or smooth, depending on your taste.
Add a Cool Avocado Dip
Avocado dip brings creaminess that works beautifully with the crunchy edge of yuca fries.
Mash ripe avocado with lime juice, a pinch of salt, and chopped cilantro. You can also add a bit of garlic or onion for extra depth.
This dip is light, smooth, and refreshing without being overpowering.
Serve with Grilled Meats or Vegan Mains
Baked yuca fries go well with grilled meats like chicken or steak.
The crispy texture and mild flavor work with smoky, savory dishes.
They also pair nicely with vegan burgers or roasted vegetables.
You can serve them as a hearty snack or a satisfying side that feels familiar but tastes new.
Storing and Reheating Tips
Leftover baked yuca fries can still be crisp and tasty if you store and reheat them the right way.
Here’s how to keep their flavor and texture intact.
Cool the Fries Before Storing
Let your yuca fries cool down fully before placing them in a container. Packing them while warm traps steam, which softens the edges.
Once they’re cool, store them in a glass or plastic container with a tight lid.
This helps reduce moisture buildup and keeps the fries from getting soggy too soon.
Keep in the Fridge for Up to Three Days
If you plan to eat your fries soon, the fridge is your best option. Store them in a sealed container and eat within three days.
Spread them out or separate layers with parchment paper to help protect the crispy edges.
Avoid tossing everything into one pile, which can lead to soft, sticky fries.
Freeze for Longer Storage
For longer storage, freeze your yuca fries after they cool. Lay them in a single layer on a tray and freeze until solid.
Then transfer them to a freezer-safe bag and press out as much air as possible.
This step helps prevent freezer burn and keeps the fries in good shape for up to three months.
Reheat in the Oven for the Best Crunch
To bring back the crispy texture, use your oven. Preheat to 400°F or 200°C and arrange the fries in a single layer on a baking tray.
Reheat for 10 to 15 minutes, flipping them once. This method helps the fries regain their golden crust without drying out the inside.
Try an Air Fryer for Quick Reheating
If you have an air fryer, it’s a great tool for reheating baked yuca fries. It uses hot air to warm them quickly while restoring their crunch.
Please set it to 375°F and heat the fries for about five minutes. Shake the basket halfway through so they crisp up evenly on all sides.
Frequently Asked Questions (FAQs)
Can I air fry yuca fries instead of baking them?
Yes, you can. Air frying gives a similar crispy texture with less oil. Set your air fryer to 375°F and cook for 15 to 20 minutes, shaking the basket halfway.
How long do cooked yuca fries last before they spoil?
Stored in an airtight container in the fridge, baked yuca fries last about 3 to 5 days. For longer storage, freeze them for up to 2 months.
Is it necessary to boil yuca before baking?
Yes, boiling helps soften the yuca and improve the texture, ensuring a tender inside and crisp outside. Skipping this step can make the fries tough or dry.
Conclusion
Baked yuca fries bring a satisfying change to your table. With their crispy edges and creamy centers, they offer a rich bite that stands apart from your usual fries.
Yuca, or cassava, holds flavor well, making every spice and dip stand out. You can go simple or bold with seasoning; either way, the result is hearty and full of texture.
Plus, they’re naturally gluten-free and baked, not fried, so you get the crunch without the extra oil.
Whether you’re using fresh or frozen yuca, these fries are simple to make and easy to enjoy.
With just a few steps, you’ll have a snack or side dish that feels fresh, flavorful, and a little unexpected—something worth making again.

Chimeremeze Emeh is a writer and researcher passionate about Africa’s most transformative root crop—cassava. Through his work at cassavavaluechain.com, he explores the entire cassava industry, from cultivation and processing to its diverse applications in food, health, and industrial use.
He also writes for palmoilpalm.com, where he shares his extensive experience and deep-rooted knowledge of palm oil, covering red palm oil, palm kernel oil, and refined products. His work there reflects his lifelong connection to agriculture and his commitment to promoting sustainable value chains in Africa.
Driven by curiosity and purpose, Chimeremeze aims to shed light on how cassava continues to empower communities, strengthen food systems, and link traditional farming wisdom with modern innovation.